Overview
🎉 The Solace Developer Relations team recently launched our SolaceCommunity github organization as a home for open source projects that are authored, maintained and supported by the amazing Solace Community. If you’re interested in joining our community you can read more about it here, but that won’t be the focus of the rest of this blog. The focus of this blog is how I enabled publishing of Java packges to Maven Central for this new github community and how you can do so for your own domain. Since Java is one of our most used languages, and most Java projects now leverage Maven or Gradle, I wanted to enable developers contributing their Java projects to be able to easily publish to Maven Central to make it easier for everyone in the community to easily use them. Over the past few weeks I went through the steps necessary to setup publishing of Java packages to Maven Central for the https://solace.community domain. This was trickier than I thought so I figured I’d share what I did to hopefully help others :)
I’m going to try to keep this short and to the point but feel free to let me know if you have any questions. I used the following resources when figuring out these steps so props to their creators!
- OSSRH Guide
- Publishing Java packages with Maven
- How to Sign and Release to The Central Repository with GitHub Actions
Setting up OSSRH (The Repository)
There are a handful of approved repository hosting options specified by Maven Central. You can find the entire list here, but the easiest approach seems to leverage Open Source Software Repository Hosting (OSSRH) so that’s the approach I decided to take.
Note that if you’re just trying to publish a few personal projects on github and are fine publishing under io.github then you don’t need to follow all of these steps so I’d suggest heading over to google and doing a few more searches :)
Get An Account
The first step down this road is to register a OSSRH account. This account will be used to prove ownership of your domain (for publishing packages), but also to manage your repositories in the future. Sign up for an account here
✅ Account Created
Prove Domain Ownership
Now that you have an account the next step in the process is to prove ownership of the domain that matches the group that you’d like to publish to. Usually this is your domain name in reverse, so something like com.company if your domain is company.com. Since our developer community is at solace.community this meant we would publish to the community.solace group.
To prove that we own this domain I had to execute a few simple steps:
- Open a New Project Ticket with OSSRH.
- Follow the instructions request in the ticket to addd a DNS TXT record to our domain.
- Wait a few hours (it says it could take up to 2 business days) for the DNS TXT record to be verified.
- Check the ticket for confirmation that domain ownership has been confirmed.
- Make a note to comment on this ticket after your first release to enable syncing to maven central!
✅ Domain ownership proven
Create Your User Token
Now that we have permission to publish to our domain we need to create a user token for publishing. This token will be used as part of the publishing process.
To get this token do the following:
- Login to the OSSRH Nexus Repository Manager w/ your OSSRH account
- Go to your profile using the menu under your username at the top right.
- You should see a list menu that is on the
Summarypage; change it toUser Token. You can create your token on this page. - Copy & Paste this token info so you can use it later! (Keep it private!)
✅ OSSRH is now ready to go and we have the info we need
Configuring the Maven pom
The next step is to setup our maven pom for publishing. Note that I used copy and paste programming to figure this out so I’m by no means an expert here :) If you are reading this and think I should include more detail here or my explanations are confusing please drop a comment and let me know.
An entire example pom can be found here
Here is what I did:
- Ensured that my
groupIdstarts with the reverse domain that we have approval to publish to! For example this is what we used, note that thegroupIdstarts withcommunity.solace.<groupId>community.solace.spring.integration</groupId> <artifactId>solace-spring-integration-leader</artifactId> <version>1.1.0-SNAPSHOT</version> -
What to know about the version! Okay this is important. When publishing maven projects you have releases and you have snapshots. A “release” is the final build for a version which does not change whereas a “snapshot” is a temporary build which can be replaced by another build with the same name. Go ahead and google this if you want to learn more :)
Once you know the difference you’re ready to set your version. Use a version ending in a number, e.g:1.1.0, for a “release” and end it in-SNAPSHOT, e.g:1.1.0-SNAPSHOTfor a snapshot. - Include a description name, description and url pointing to your repository. For example,
<name>Solace Spring Integration Leader</name> <description>This project allows for Spring Integration Leader Election using Solace Exclusive Queues</description> <url>https://github.com/solacecommunity/spring-solace-leader-election</url> - Include a license, source control info
scm, developers and organization(I believe this is optional) information.<licenses> <license> <name>MIT License</name> <url>https://github.com/solacecommunity/spring-solace-leader-election/blob/master/LICENSE</url> <distribution>repo</distribution> </license> </licenses> <developers> <developer> <name>Solace Community</name> <email>community-github@solace.com</email> <organization>Solace Community</organization> <organizationUrl>https://solace.community</organizationUrl> </developer> </developers> <organization> <name>Solace Community</name> <url>https://solace.community</url> </organization> <scm> <url>https://github.com/solacecommunity/solace-spring-integration-leader.git</url> <connection>scm:git:git://github.com/solacecommunity/solace-spring-integration-leader.git</connection> <developerConnection>scm:git:git@github.com:solacecommunity/solace-spring-integration-leader.git</developerConnection> <tag>HEAD</tag> </scm> - Add a profile for OSSRH which includes the
snapshotRepositoryinfo, thenexus-staging-maven-plugin, and themaven-gpg-plugin. Note in the example below I have this profileactiveByDefaultso you don’t have to specify it when running maven commands, however you may not want to do this. Depends on your use case :)<profile> <id>ossrh</id> <activation> <activeByDefault>true</activeByDefault> </activation> <properties> <gpg.executable>gpg</gpg.executable> </properties> <distributionManagement> <snapshotRepository> <id>ossrh</id> <name>Central Repository OSSRH</name> <url>https://s01.oss.sonatype.org/content/repositories/snapshots</url> </snapshotRepository> </distributionManagement> <build> <plugins> <plugin> <groupId>org.sonatype.plugins</groupId> <artifactId>nexus-staging-maven-plugin</artifactId> <version>1.6.7</version> <extensions>true</extensions> <configuration> <serverId>ossrh</serverId> <nexusUrl>https://s01.oss.sonatype.org/</nexusUrl> <!-- Change to true once we're good! --> <autoReleaseAfterClose>false</autoReleaseAfterClose> </configuration> </plugin> <plugin> <groupId>org.apache.maven.plugins</groupId> <artifactId>maven-gpg-plugin</artifactId> <version>1.5</version> <executions> <execution> <id>sign-artifacts</id> <phase>verify</phase> <goals> <goal>sign</goal> </goals> </execution> </executions> <configuration> <gpgArguments> <arg>--pinentry-mode</arg> <arg>loopback</arg> </gpgArguments> </configuration> </plugin> </plugins> </build> </profile> - Include the
maven-release-plugin, themaven-javadoc-plugin, themaven-source-pluginand theflatten-maven-pluginplugin.<build> <plugins> <plugin> <groupId>org.apache.maven.plugins</groupId> <artifactId>maven-release-plugin</artifactId> <version>2.5.1</version> <configuration> <tagNameFormat>@{project.version}</tagNameFormat> </configuration> <dependencies> <dependency> <groupId>org.apache.maven.shared</groupId> <artifactId>maven-invoker</artifactId> <version>2.2</version> </dependency> </dependencies> </plugin> <plugin> <groupId>org.apache.maven.plugins</groupId> <artifactId>maven-javadoc-plugin</artifactId> <version>2.10.4</version> <executions> <execution> <id>attach-javadocs</id> <goals> <goal>jar</goal> </goals> </execution> </executions> <configuration> <source>8</source> <detectJavaApiLink>false</detectJavaApiLink> </configuration> </plugin> <plugin> <groupId>org.apache.maven.plugins</groupId> <artifactId>maven-source-plugin</artifactId> <version>3.0.1</version> <executions> <execution> <id>attach-sources</id> <goals> <goal>jar</goal> </goals> </execution> </executions> </plugin> <plugin> <groupId>org.codehaus.mojo</groupId> <artifactId>flatten-maven-plugin</artifactId> <version>1.1.0</version> <configuration> <updatePomFile>true</updatePomFile> <flattenMode>oss</flattenMode> <pomElements> <distributionManagement>remove</distributionManagement> <repositories>remove</repositories> </pomElements> </configuration> <executions> <!-- enable flattening --> <execution> <id>flatten</id> <phase>process-resources</phase> <goals> <goal>flatten</goal> </goals> </execution> <!-- ensure proper cleanup --> <execution> <id>flatten.clean</id> <phase>clean</phase> <goals> <goal>clean</goal> </goals> </execution> </executions> </plugin> </plugins> </build>
✅ The maven pom is now ready to go!
Create GPG Keys
The next step is to create a GPG key for signing the published packages. This allows for users of your project to verify the published package’s authenticity and trust using it in their own projects. In order to create a GPG key you will need to execute a few steps.
Create Your Key
The first step is to Create Your Key. You can do this locally using a tool such as gpg. Be sure to keep your private key private. If others get ahold of this they can become a trusted publisher of your packages.
- Install the gpg tool; on mac you can do this by executing the command below. If you aren’t using a mac check out the instructions here
brew install gpg - Generate your key pair. You will be prompted for a “Real Name” and “Eamil Address” that you want to use with the key
gpg --gen-key
✅ GPG key created!
Share Your Public Key
Now that you’ve generated your key pair, which consists of a private and a public key, you need to share the public piece. The public key will be used by developers to verify the package’s authenticity. You can also do this with the gpg command. It will share your key to a keyserver which tools such as maven know how to query to retrieve the keys for automated verification.
- Get your keypair identifier.
To do this you need to list your keys. The key will have an identifier that looks like a random string of characters, something like C48B6G0D63B854H7943892DF0C753FEC18D3F855. In the command below I’ve replaced it with
MYIDENTIFIERto show it’s location.MJD-MacBook-Pro.local:~$ gpg --list-keys /path/to/keyring/pubring.kbx ---------------------------------------- pub rsa3072 2021-03-11 [SC] [expires: 2023-03-11] MYIDENTIFIER uid [ultimate] solacecommunity <community-github@solace.com> sub rsa3072 2021-03-11 [E] [expires: 2023-03-11] - Distribute to a key server using the identifier found in the previous step. Note that you may want to publish to a different keyserver. The one that worked for me was
hkp://keyserver.ubuntu.com:11371gpg --keyserver hkp://pool.sks-keyservers.net --send-keys MYIDENTIFIER
✅ We’ve now shared our public key!
Configure the Github Secrets
Okay at this point our project is looking pretty good and we could run a deployment locally using the mvn --batch-mode clean deploy command, however we actually want to perform our releases via a Github action. Shoutout to sualeh for creating this gist which helps me navigate the next few steps! In order to make the release from a Github Action we need to make our GPG private key and OSSRH user information available to the Github actions while also keeping it private. We can do this using Github Action Secrets.
I created secrets at the Github Organization level so I followed the steps below to keep my OSSRH_GPG_SECRET_KEY,OSSRH_GPG_SECRET_KEY_PASSWORD,OSSRH_USERNAME and OSSRH_PASSWORD secret. If not clear by the name these are my GPG Secret Key, my GPG Secret Key password, my OSSRH Username (from the token we generated earlier) and the OSSRH password (from the token we generated earlier).If that screenshot feels out of date you can find the docs here
✅ Secrets configured!
Setting up the Github Action
Now that the Github Action Secrets are available let’s go ahead and configure the Github Action itself. To give credit where credit is due, I created this github action using this gist as a starting point. You can find the Github Action workflow file here.
You’ll see below that this Github Action will run on the latest ubuntu and execute the publish job which has several steps. The steps will setup the maven central repository info, install the secret key and then run the command to publish to OSSRH.
name: Publish package to the Maven Central Repository
on:
  release:
    types: [created]
jobs:
  publish:
    runs-on: ubuntu-latest
    steps:
      - uses: actions/checkout@v2
      - name: Set up Maven Central Repository
        uses: actions/setup-java@v1
        with:
          java-version: 11
          server-id: ossrh
          server-username: MAVEN_USERNAME
          server-password: MAVEN_PASSWORD
      - id: install-secret-key
        name: Install gpg secret key
        run: |
         cat <(echo -e "$") | gpg --batch --import
         gpg --list-secret-keys --keyid-format LONG
      - id: publish-to-central
        name: Publish to Central Repository
        env:
          MAVEN_USERNAME: $
          MAVEN_PASSWORD: $
        run: |
          mvn \
            --no-transfer-progress \
            --batch-mode \
            -Dgpg.passphrase=$ \
            clean deploy
✅ Github Action ready to go
Running the Github Action - let’s test it with a Snapshot release
Now you’re ready to run the Github Action. I’d recommend testing out the publishing of a snapshot release first. To ensure you do this make sure your version in the pom ends in -SNAPSHOT as discused earlier.
-
Once the version on your
mainbranch includes-SNAPSHOTgo ahead and run the github action workflow. You should see thepublishjob successed in a few minutes depending on how long your build takes. Ours took 1m 20s the first time. -
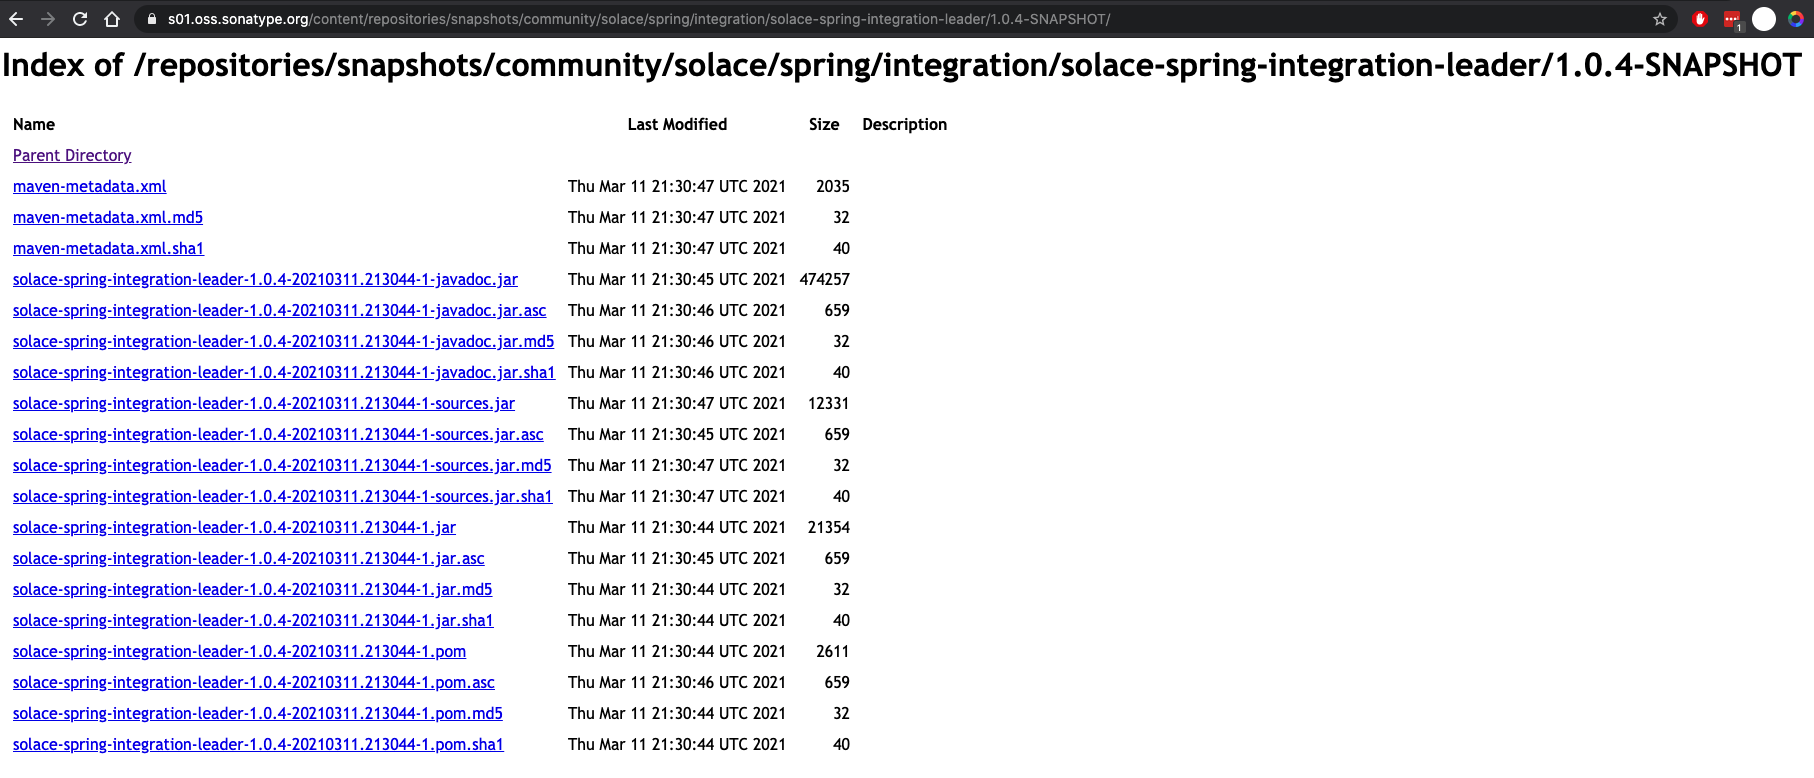
After the deploy job successfully runs you can head over to https://s01.oss.sonatype.org/content/repositories/snapshots/ and navigate to your project to verify that the snapshot has successfully deployed. It should look something like this:
✅ Snapshot published!
Running the Github Action - now let’s make an actual release
Now that the snapshot has successfully deployed let’s go ahead and make a real release. Make sure your code is ready before doing this part of course :)
- Change your version in the pom to remove the
-SNAPSHOT, so it should end in a number. Something like1.1.0. - Re-Run the Github Action workflow. Wait for the publish job to succeed :)
✅ At this point our project will be staged for release. There is just one more step!
Approve the Deployment in Nexus
Now that our project is staged for release we need to login to the OSSRH Nexus Repository Manager to promote the release.
- Login to the OSSRH Sonatype Nexus Repository Manager
- Navigate to the
Staging Repositoriesin the menu on the left hand side. - Examine the contents of the release and if everything looks good
closethe release. More information is available here - The OSSRH deployment is now complete, but if this is your first release remember to go back and comment on your “New Project Ticket” we created earlier so your project will sync to Maven Central.
✅ Deployment Complete!
Check out the deployed project!
After ~24 hours head over to Maven Central’s search and you should be able to find our project by typing in your groupId or artifactId.

Conclusion
Hope this was useful! Feel free to leave a comment if you have any questions :)